The ability to keep systems online, ready, efficient, and agile to respond to customer requests is the daily challenge in infrastructure management.
An efficiently organized infrastructure environment gives us advantages when dealing with incidents, allowing us to isolate faults and identify issues in less time with less impact.
Another advantage is that it allows easy monitoring and management of costs and is also beneficial in the ongoing search for resource optimization.
In this article, we will talk about three tools that, when combined, will help us keep our environments properly organized and facilitate cost management and control.
We will look at Resource Groups and the Tag Editor, ending with Cost Allocation Tags.
1. Resource Groups
Service types organize the AWS console. However, with Resource Groups, we can create a custom console to organize and consolidate resources according to tag criteria.
With this feature, we can easily manage applications in distinct phases, such as development, staging, and production, and manage resources from various projects or those used by other departments, individuals, or platforms (e.g., Android or iOS).
Suppose we have several versions (alpha, beta, release) of an application and maintain the sets of resources separately. Without Resource Groups, we would need to navigate multiple service consoles to modify settings or review the status of the resources for each application version.
In contrast, when we use Resource Groups, we can create a group of resources for each version, open the page of the required version, and that's it; we already have the consolidated information of all the resources and access to each service through links.
With Resource Groups, we can also automate tasks on multiple related resources and execute them in bulk.
Suppose we have several Ec2 instances. In that case, we will find it very useful to install updates or security patches, open ports for network traffic, and collect specific logs and monitoring data from a fleet of instances simultaneously.


Here you can review the list of services that work with Resource Groups.
How to use Resource Groups step by step:
Go to the AWS console and then to AWS Resource Groups.
- In the Resources section, enter Create Resource Group. In Group Type, select Tag Based.
- When you find the Grouping Criteria section, select the type of resources from the dropdown list in Resource Types and choose the tag key and tag value to be included in the group. Click on Preview Group Resources.
- Check that all the resources you want to include in the group are there, and go to Group Details. Then, provide the group's name and the description in Group Name and Group Description, respectively.
- We recommend that you include the group identification tags in Group Tags.
- Select Create Group.
Here you can delve into the options and other features of Resource Groups.
2. Tag Editor
The fundamental base of Resource Groups are tags.
Tags are words or phrases that help us to identify and organize resources. Each resource may contain up to 50 user-applied tags containing a name-value combination.
Applying tags facilitates various processes of resource management:
- Grouping resources to manage them for technical purposes (environments, application, project version).
- Automation (scheduled power on/off, updates, life cycle, clean up).
- Discriminated costs (application, project, environment).
In terms of security, they allow you to view resources with specific compliance and access policies. - We can add tags individually when we are creating resources or later. However, Tag Editor adds tags to multiple resources simultaneously and helps us deploy a tagging strategy consistent with our goals.
Since we are talking about resource identification strategies (Tagging Strategy), we must consider that application, flows, or workloads evolve and are subject to multiple changes.
Therefore, it is essential to plan the schemes and the application of the tags diligently.
The success or failure of everything we have discussed depends on this; it will not work if we frequently change the tags as we increase the number of resources.
Here you can check a guide to good practices for creating tags.
Tag Editor lets us search for resources in one or more regions. We can choose up to 20 types of resources individually or create a query on all kinds of resources, including those already tagged and those with no tag. After finding the resources, we can add, view, edit, or delete tags.

As a helpful feature, we can export the results of a resource search to comma-separated values (CSV) file.

Learn how to use Tag Editor step by step:
We have the option of including the resource tags during their creation or later with the help of the tag editor:
- Go to the AWS console and then to AWS Resource Groups.
In the Tagging section, enter Tag Editor. - In the Find Resources to Tag Section, select the region where the resources to be identified are hosted.
- In Resource Type, choose the resource type from the dropdown list or select all the supported resources.
- There is an optional filter by tags, selecting the tag key and the tag value. You can narrow down the search and add new tags to resources that already have some.
- The search results are displayed in the Resource Search Results section. On the left side of the list is a check box to select the resources we want to add or modify.
- The Manage Tags of Selected Resources option is enabled once the first resource is set on the right side of the section header.
- Select the check boxes of the relevant resources and enter Manage Tags of Selected Resources.
- In the Edit Tags of All Selected Resources section, add or overwrite the tags of all selected resources. Check and apply changes.
Follow this link for more information on the setting and management of Tag Editor.
Tips for a successful Tagging Strategy
As mentioned, this is the most critical moment for sound resource management. The following are some things to keep in mind:
- Have a standardized, known nomenclature respected by team members.
- Tags should conform to automated resource creation; for example, instances launched from autoscaling groups or code-provisioned infrastructure.
- For automated tasks such as turning resources on/off, tags help to indicate which resources can be turned off or stopped.
- Device tags for cost control. We can use the tags defined in the resource group or assign new ones, as needed, to separate them for cost analysis.
Cost Allocation Tags
Cost Allocation Tags is a service that enables us to download cost reports broken down by projects, versions, etc. Only reports with user-defined tags should be enabled, providing each resource's cost information according to the previously described tags.
The following is the image of a fragment of the cost report with the tag "powerbi," previously enabled:
We can obtain allocation and cost information by filtering the downloaded .csv file. The tags defined here must be consistent with the tagging strategy mentioned above.

Cost Allocation Tags step by step
Enable the user-defined Cost Allocation Tags and configure the Cost Allocation Report and then:
-
Go to the AWS console and then to AWS Billing.
-
In the navigation panel, select Cost Allocation Tags. In the User-Defined Cost Allocation Tags tab, choose the tags you want to see in the cost report and click Enable.
-
Once enabled, it may take 24 hours for the tags to appear on the cost report. For more details about enabling it, check this link.
-
In the AWS Billing navigation panel, under the Preferences section, enter Billing Preferences.
-
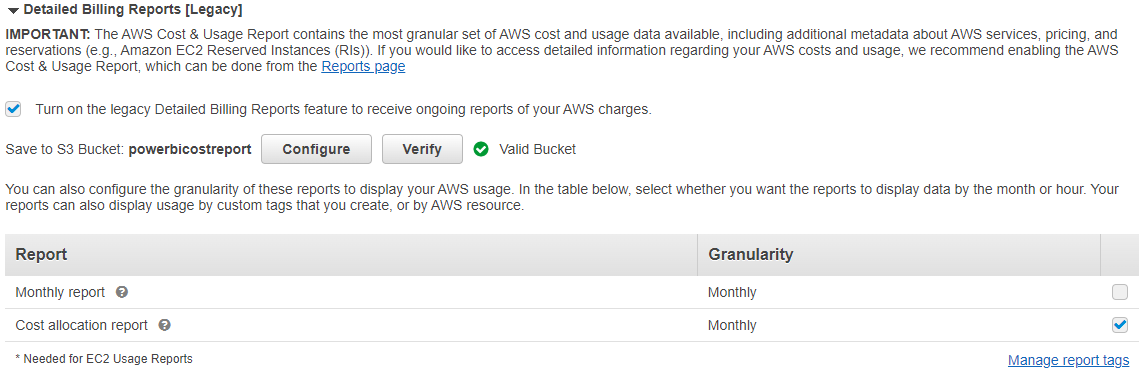
Display the Detailed Billing Report [Legacy] menu and mark the check box:
-
Save to S3 Bucket, enter a valid name for the bucket to host the reports and select Check.
-
Check the box of the Cost Allocation Report.
-
From here, it is possible to enable other tags for the report by accessing Manage Report Tags.
-
When finished, click on Save Preferences.
The reports are stored in the configured S3 bucket. Go to this link to learn other options and characteristics of the report.
Basic settings
Resource Groups and Tag Editor require permission to add or view Tags in each resource involved. Besides, we must have the appropriate permissions to execute operations on Resource Groups and Tag Editor.
Here you can learn about the necessary permissions.
Only organization management accounts and individual accounts that are not part of an organization have access to the Cost Allocation Tags manager in the Billing console.
Conclusions
Using tags in conjunction with Resource Groups, we can view resource information in one place instead of switching between multiple consoles or regions.
By activating Cost Allocation Tags, we will have information on costs and uses for resources with specific tags in a disaggregated way.
Keep in mind there are other tagging tools and services we did not mention in this article, such as AWS Budgets, where we can configure usage limit notifications for resources with a particular tag.
Share this

Nearshoring for IT projects
%20-%20Cloud%20service%20(en)/blog-well-arquitected-card.png?width=428&height=279&name=blog-well-arquitected-card.png)
We Are Part of the AWS Well-Architected Partner Program. Discover the Benefits

A Journey to the Cloud: Powering Your Business Growth with AWS
